Showing posts with label free motion quilting. Show all posts

Sunday, 30 October 2016

Free Motion Quilting - What I have learnt

As you know I love patchwork. I have made clothes and bags, but patchwork is my passion!
 
It all started back in 1996 when I spotted a patchwork quilt in a magazine and immediately bought a small cheep sewing machine. That fist king size quilt has pride of place in my bedroom and is still used to build dens!
 

Faded and worn, but a den building staple!
 
For  person who avoided sewing lessons at school because they were for girls that is quite an achievement!
 
When I started patchwork I was  determined hand quilter. I couldn't seem to get the machine to quilt in the way I wanted it to, so I stopped trying - I didn't realise I needed special feet and strong enough thread.
 
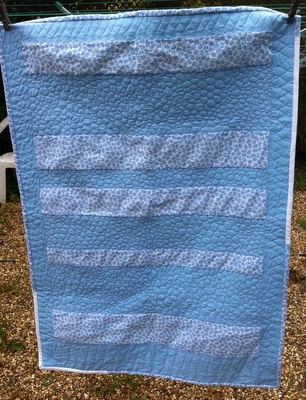
In 2011 that all changed when my youngest son requested a quilt for his birthday which was 3 weeks away. I undertook a self taught crash course in machine quilting. The joy of the internet is that you can find out pretty much anything and I was able to find out why my previous attempts had never worked. The quilt was finished at 2am on his birthday and he still pulls it out to snuggle under whenever he can.

The birthday quilt designed by mini.

My first attempt at free motion quilting!
 
So my free motion journey has been a relatively short one - especially placed in the context of the 20 years I have been making quilts. And it is a journey I have loved. In fact I often love the free motion quilting more than the patchwork.
 
As a sewing teacher I have taught free motion quilting to all my patchwork classes. Some students love the challenge and throw themselves in whole heartedly, whilst others give it a go and then run away screaming!
 
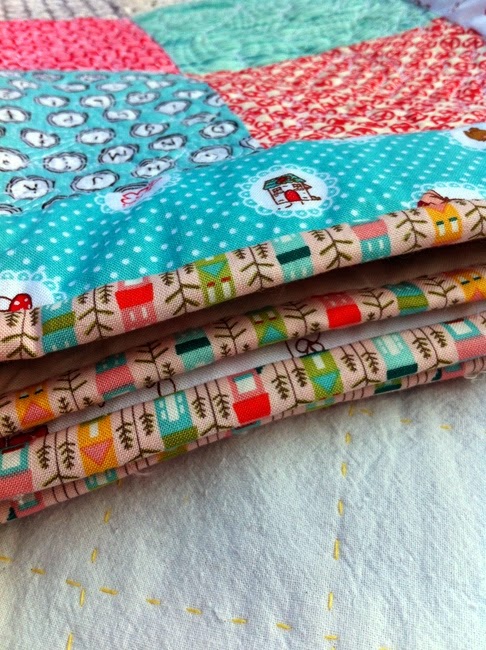
It is a hard skills to master - especially on a small domestic machine - but is one that is worth working on. My free motion is not perfect and nor do I ever expect it to be. I have the privilege of knowing that if I select a thread that matches the fabric I am working on then all of my faults will fade into the background of the quilt. They will add texture and interest. Even if the thread doesn't blend in the not so perfect pebble will look perfectly fine in a sea of not so perfect pebbles. They will all look amazing together!

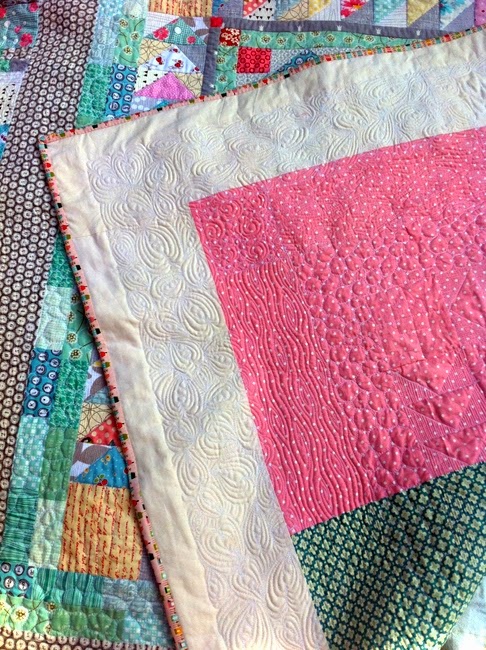
'Mistakes' make up part of the whole design.

For beginner to free motion quilting this idea of just doing it, ignoring the little 'mistakes' and trusting the journey can be tough. It can cause a project to be rejected. But you must keep going, keep quilting, keep moving forward. Each time to quilt with our machine you are getting better. Each pebble will blend in with the other pebbles.  You will never reach perfection but you will create a unique quilt that will wrapped around you family and friends for many years - 20 years and counting in my household.
 
When in doubt - just keep quilting!

Sunday, 16 March 2014

A Special Quilt!

One of goals this year is to only buy fabric for my classes and to make quilts from the fabric in my stash and scraps buckets.

One of my lovely friend's had a big birthday this year and I wanted to try the Marcelle Medallion quilt by Alexia Abegg's book Liberty Love. When I bought the book and then watched the QAL on Instagram I was hooked.

I decided that I wanted to make this quilt for my friend, so set about making the centre last summer. I will admit it was a frustrating process that was not fun. The Y seams and the small pieces not connecting properly left me really annoyed! Since then I have found this paper piecing tutorial for the block which would make the process much easier!

I put it aside for a few months whilst I started my City and Guilds, but dug it out 5/6 weeks ago and started working on it for the friends birthday.

Work in Progress, and Lego in as usual in the background.
Because my centre block was the wrong size I had to adapt the pattern in a few places, but overall it worked well!

Once the patchwork was finished I set to work machine quilting it, but loads of safety pins where involved first!

Lots for lovely safety pins!
I decided that I would quilt each border with a different pattern:


Lots of tiny pebbles, swirls and star bursts!

As the borders grew I increased the size of the pattern to include a tree bark pattern and the some love heart paisley in the final border, along with the family names of my friends family.


On the back I used fat quarters from my stash. The quilt patterns show up really well on the backing. It is lovely!


I found some fabulous little houses for the binding, which made me smile and fitted in perfectly with the colours in the quilt top.


The finished quilt is so totally gorgeous, and it did cross my mind to keep it for myself!

Luckily I didn't and it is now living in my friends house and very much loved!


Sewing Info:

Pieced and quilted with Aurifil 2024.
Pieced and quilted on a Janome CXL301.

Wednesday, 7 November 2012

Pliers and Elastic

The other day I shared a video from Leah Day about adapting the free motion foot on your sewing machine to get better results when free motion quilting.

I thought it be worth sharing my experience so far...

I bravely bent the bar at the top of the spring, but it actually snapped off... luckily it still holds the spring in place!


My pliers had prongs on so I didn't snip the plastic guide at the front as Leah suggests, but if I am honest it doesn't bother me at the moment so I think I will just leave it for now.

The hardest thing has been the elastic band..

Initially I thought the band had to be wound on so there was no gap between the spring and the top of the foot. It has worked fine, but the gap between the foot and the quilt seemed enormous and made me slightly nervous!


Today I finally put 2 and 2 together and realised that there does need to be a gap so that it skims over the top of the quilt. But it is important that it doesn't lower completely onto the quilt, otherwise you won't be able to get any free motion out of the foot!

The machine is much quieter and it is fantastic to not have the foot jumping around every stitch it takes. If it starts to go off course the elastic band can be added or removed to change the pressure the foot is putting on the quilt.

At first Leah's advice seemed a bit extreme, but I am glad I followed it!


Monday, 5 November 2012

Using pliers...

I have been following Leah Day since I found her blog earlier in the summer, I have used her wonderful blog to practice free motion quilting. Her designs are so imspirational.

So when I found out the folk at Craftsy had recruited her to teach a quilting class, and I could get it 50% off because I already have classes there, it was an immediate decision to enrol!

I have watched the first couple of lessons and she talks about adapting your free motion foot so it works better on your machine.....

The suggestion she makes is pretty drastic, but I decided it was worth a go - plus I have another foot in the post if it back fires on me!

So I set to the foot with pliers and an elastic band to adjust it as she suggests.

She actually has a video of it posted on You Tube from a while ago, so I thought I would share it with you.


In all honesty I was nervous about making the changes, but it has meant the machine is quiter and the foot now just glides over the surface of the quilt whilst I work. It has also taken a little bit of playing with the height of the foot and the tension on the machine, but I do like how the quilt glides under the foot...

Monday, 22 October 2012

Perfecting the Design...

Last week I finished a quilt top for a special birthday present.

It is gorgeous, but huge!

I have taken the Craftsy course by Angela Walters about Quilting Negative Spaces and she suggested breaking large quilts down into sections to quilt. To be honest I was a bit sceptical about that working - I mean if I quilt certain areas and then move on to another surely the layers will bunch up?


So I sat down with the gorgeous quilt and pondered a design... and I decided that the size of it does mean I have to work in sections, so what to do?


I had already decided to do a sun ray pattern in the octagons, a swirl in the middle and wavy lines radiating out, but the negative spaces had been a bit more of a mystery...

I tried a hoop design and turned over the quilt to discover a great big crease... plus the design just didn't look right in the space... seam ripper was found...

Then I tried a large single swirl... again it didn't look right and I got a crease....I hate that bloody seam ripper...

Finally I took a break and decided on a line design in one section and swirls in another... Now I am happy!


The Tula Pink design suits the sun ray design in lilac thread.


The corners of the octagon have lines rediating out.
 
 
Sun ray in progress on the next octagon.


I had drawn everything out, but when the ideas were actually transferred to the quilt, they looked wrong... so I am machine quilting the biggest quilt yet in sections, taking care to get it as perfect as I can...


I am late with my gift already, but I am hoping the work and effort I have put into it will make up for the lateness!


Thursday, 11 October 2012

Little Elephants

Last week I finished my blue elephants quilt for the son of my lovely friend Liz. It was a first birthday present for him.


It is a really simple design, taking inspiration from Film is in the Fridge blog. It is strips of blue matched with gorgeous little elephant fabric...  I love those little elephants!


It is the second time I have free motioned a quilt from start to finish - the first time as back in February for mini. I used my Craftsy class by Angela Walters to improve my quilting skills. The back looks just as lovely as the front:
 

I used pebbles on the solid blue strips:


Angela recommends using a pen and paper to sketch out the quilt design. Really helps to think ahead when you are actually quilting.

The texture was great! It made it feel gorgeous!

I decided to use the figure of eight pattern on the border... this one needs some more work, but I did enjoy giving it a go!


I really loved making this quilt and trying out new techniques.... just need to find another small child I can make another one for!

Sunday, 26 August 2012

Free Motion 10/365

Yesterday got away from me and I didn't manage to make my block.

On Friday it was Cursive F's, which were quite easy and lovely to move around on the machine.

Today it is Dresden Daisies.


It is quite an easy design to learn, but hard to master!

My flowers are really uneven, but I do like the design.

I also found it easier to form the flowers with the block moving forwards and backwards as apposed to the left to right motion Leah uses - that may be my foot, it is easier to see me work in that direction.

Such a pretty design though!


Friday, 24 August 2012

Free Motion 9/365

A little bit late today - I completed the block as the boys were getting into bed, but then started working on a huge, bright quilt and then end is in sight!

So today's block is called Cursive F's, which are lovely f's in rows....


It was an interesting design to quilt (sorry for the awful photo!), I experimented with straight f's, elongated f's and small f's.

I really enjoyed working with the block, but as Leah points out, it is a border design, I am not sure I put it into a quilt as the main pattern.

Thursday, 23 August 2012

Free Motion Quilting 8/365

Today the block is Wobbly Cosmos.

It is a pretty cool design because it works out from the centre and is like an explosion of colour!

I really like the fuchsia pink Aurifil Thread I used too!


Looks really groovy!

Wednesday, 22 August 2012

Free Motion 6 and 7/365

Yesterday I choose my block, Overlapping Arches, and headed out to the studio to sew.

It was late after a very long day of teaching, dentist and grumpy children, so when I got down to quilting I had totally forgotten I wanted to overlap the arches and ended up with just arches...


So this is day 6. I kinda like it. It is very simple to do, but does take practise to keep the stitches even when going over the curves. Looks like lovely fish scales!

Today I re-watched the video and had another go at over lapping the arches:


I prefer the effect of overlapping the arches. The stitch length does vary though, which I have decided will improve the more I work on my free motion quilting.

On a separate note, the gloves are fantastic! I started last night without them by accident and found it all so much harder! So if you are unsure about them, don't be! They make a huge difference!

Monday, 20 August 2012

Free Motion Quilting 6/365

Today I am really late doing my free motion block, work has been a bit chaotic!

So today I decided to have a go at swirls and rounded corners.

The block is called Flowing Glass:


The block is quite easy to do, but getting the stitches consistent is quite hard. Plus I didn't work into the middle enough on the first side - a fear of going out too far - so when I was travelling up the other side I really had to go right across the void!

The gloves were great again and made real difference to moving the square around.

Sunday, 19 August 2012

Free Motion Quilting 5/365

Yesterday was the Matrix, which I really enjoyed working on. It is such an intense design and perfect for filling space.

Today I went back to swirls: Spiral Vine.


It looks really good! Yesterday at the Festival of Quilts I invested in the quilting gloves that Leah suggested on her blog (I am not stalking her I promise!). They are called Machingers Quilting Gloves, which you can get from Leah's shop if your in the States or from Creative Grids in the UK. They definitely made moving the square much easier and I felt I had much more control.


I will let you know how I get on using them on the bigger quilt I am working on.....

Free Motion Quilting 4/365

I managed to have a go at this design once I got back from the Festival of Quilts yesterday, but I didn't manage to get it online. So today there will be two designs.

The fourth design is Matrix.


It isn't too hard to do, but I did get a bit confused about direction in one of the corners and then I think I put too big a dip into the line so the lines kinda get confused and muddled... but pretty easy to do and looks good!

I will do the next one later... swimming with the monsters first!

Friday, 17 August 2012

Free Motion Quilting 3/365

Yesterday was not too bad.... Today was a different experience!

I decided to try Oil Slick. It was hard!


The curving was fine, it was the re-tracing your stitches.. that is mega hard when you are turning corners. It just looks totally weird!

But at least I gave it a go...

Thursday, 16 August 2012

Free Motion Quilting 2/365

OK, so yesterday was fun... I checked it out today and it was OK...

Today was harder!

I picked at random from the beginner page Sea Algae....


Not too bad, but not great. I did enjoy seeing it coming together though!

Where to tomorrow...... any suggestions from the beginners page?

Wednesday, 15 August 2012

Free motion quilting 1/365

So, after checking out Leah Day's website and her fantastic journey through free motion quilting last week, I have decided to try out her designs.

The best way to learn a new skill is to do it, and do it often!

So I am going to try and do one of her blocks everyday... I think by the time I have practised free motion quilting everyday for a year, I should have cracked it!

So here is today's go:


It is the Shadow Waves block that starts the beginners section of Leah's patterns. It's not perfect, but I do like the texture and I tried to concentrate on getting the stitches the same length!

Tomorrow I have picked Sea Algae, we shall see how that goes!


Friday, 3 August 2012

Free Motion Quilting Lessons

As I said yesterday, machine quilting with a walking foot was an elusive skill. It frightened me, free motion quilting was way to scary to even contemplate!

My machine quilting was kicked started by my lovely mini monster requesting a patchwork quilt of his own. It has started a new obsession with all things machine quilting - it is really addictive once you get past the fear factor!

Yesterday I came across this amazing blog by Leah Day:

The Free Motion Quilting Project


Leah started an amazing journey in free motion by quilting 365, 4 inch squares each with a different design.

Each design comes complete with a video to show you how to get started and tips on how to complete the design.

For me this is made all the more perfect because she has divided all of the blocks into difficulty. The beginners page has an amazing array of patterns. After watching a few videos I feel confident to give the designs a go.... I even even sorted out some cotton to get my own blocks ready for practising!

Every Thursday Leah has a question blog, so you can email her your question about quilting and she will answer them on the blog - perfect!

So the next stage of machine quilting starts next week!

Happy quilting!


Thursday, 2 August 2012

Trying out new skills...

I have been a quilter for many years, but always had a fear is machine quilting. It was a totally irrational fear, but I know lots of people share.

In January, my youngest son announced that he was the only child in the house without his own quilt. He insisted that his birthday present was a quilt.... not a major problem, except his birthday was 4 weeks away! There was no way I could possibly make a patchwork top and then hand quilt it in 4 weeks!

There was nothing for it, I was going to have machine quilt his present and do it quickly!

He picked his fabrics and we decided on simple circles on a plain background, so the patchwork was simple enough. Then I faced down my fears and free motion quilted the quilt using swirls and stars.


I am very proud of my first attempt, and more importantly, mini monster loved it!

So now I have switched my focus from bags to teaching, I have some time to play with quilting, I am having a go at free motion and straight machine quilting:


I love this quilt and the way that the quilting is making it change and the texture is gaining!

The free motion flowers and a bigger challenge but I am enjoying it:


So the adventure in machine quilting will continue, accompanied by my stack of new quilting books for inspiration and tips!