This weekend has been a relatively chilled out weekend... we have tidied the house, wandered into town, had a friend for, been to rugby practice and visited Newark Park to munch ice cream at the Love Food Festival - a must for foodies!
But it is a weekend I feel I have reached a turning point with my boys....
Yesterday did not start well. My ability to cope with the general mess and clutter of 3 boys was blown apart by a pair of dirty pants in the middle of the living room floor surrounded by toys, plates and general guff. Mummy didn't blow sky high, but did put start questioning why exactly they thought it was ok to do that!
There followed a discussion (albeit one sided) about how hard mummy works, how mummy runs 2 Scout groups, takes them to loads of things - Legoland and the Paralympics this year - and she needs help! Mummy needs help to tidy, mummy needs help to keep the place looking nice so our friends can come round and mummy doesn't die of shame..
Mummy can't do everything by herself... and mummy isn't asking them to wipe their wee off the bathroom floor, or cook dinner... mummy just wants them to help tidy up and put things away.. mummy just needs help... please....
So with loud music on and frequent food breaks we tackled the living room and hall... we dusted, hoovered and sorted things for the charity shop... we now have a kinda tidy and sorted house - just open the cupboards in the hall!
Obviously my immediate thought is, Great I love them to pieces, but I will be having the same conversation in 2 weeks...
Until this morning... I asked for them to sort their room before Rugby, they did without complaining...
Then this afternoon driving home from Newark Park midi piped up in the back:
"Mummy, everyone we know have a mummy and daddy and they do the things we do, but you have to work much hard because you don't have a daddy to help you. Mummy thank you for working so hard for us."
I almost crashed the car! Then he said:
"I understand that we need to help you at home so you can work and take us out to places. Mummy you are the best mummy ever because you do all that without a daddy to help you. I love you"
Mini then contributed:
"Yeah mummy, we love you. We help you more so you can go to work and buy us presents...."
They are 6 and 4, and it is a small victory, but it is a victory.
The drive home is 20 minutes and they spent the whole 20 minutes telling me how they are going to help. Telling me that they know I am special..
Small words, but major thoughts... thoughts that have been thought about for a whole night...
They may not last, but the corner we have turned has now be turned...
And mummy's heart swelled with pride and a few tears were shed on the drive home.....

Sunday, 14 October 2012

Saturday, 13 October 2012
And the winner is...
I am very late in getting the winner drawn using Random.Org...
The closing date was Monday and I have finally found the time to organise the draw - I am really sorry!
So the winner of the Make and Craft Book Blog Tour has been chosen from the 12 entrants and is....
The closing date was Monday and I have finally found the time to organise the draw - I am really sorry!
So the winner of the Make and Craft Book Blog Tour has been chosen from the 12 entrants and is....
Gill
If you email me Gill with your address I will get your price, Noah's Ark craft book out to you!
Thank you to everyone who commented!
Friday, 12 October 2012
Fabric shopping...
I haven't been fabric shopping again - I promise!
But I have noticed a few bundles that I really love!
Starting at M is for Make, this simply stunning bundle is seriously calling me:


But I have noticed a few bundles that I really love!
Starting at M is for Make, this simply stunning bundle is seriously calling me:

It's called Bittersweet and I want it!
I am a huge fan of Gone to Earth, and there is the lovely, scrummy Oh deer Bundle....

Saints and Pinners is another shop I really love. They have some amazing bundles, but this one is my favourite:
Jewels is a glorious bundle of plains... yummy!
I know, too much yumminess!
Today I am actually off to Thermae Spa in Bath and there is the wonderful Country Threads patchwork shop just around the corner... might just find myself wandering into there....
Thursday, 11 October 2012
Make me a Pretty Purse
Make me a Pretty Purse
Instructions
for making a pretty purse.
Here are the instructions for making a simple, but pretty little purse! Perfect as gifts!
Here are the instructions for making a simple, but pretty little purse! Perfect as gifts!

100%
cotton for outer and lining
Heavy
sew-in and woven iron-on interfacing
6”
zipper
6”
ribbon/ric rac
Button
Pre-cut Pieces:
 |
4 rectangles
5.5” high by 6” wide – 2 for the lining and 2 for the outer fabric.
|
4
rectangles 5.5” by 6” – 2 from the sew-in interfacing and 2 from the iron-on
interfacing.
|
|
Seam
allowance: 1/2” unless otherwise stated.
| Step 1:
Zigzag
stitch over the end of the zip to keep the zip closed whilst you make the
purse.
|
 |
 |
Step 2:
Iron
the iron-on interfacing on the wrong
sides of the out fabrics and pin the sew-in interfacing onto the wrong side too.
Step 3:
Take
one of the outer fabrics and place
it right side up. Put the ribbon 1.5” down from the long edge, pin and then stitch in place. |
Step 4:
Mark the
middle of the ribbon/ ric rac and sew the button into over the mark you have
made.
This is now
the front of your purse.
|
 |
 |
Step 5:
Place
one of the lining pieces
right side up and place the zip along the 6” edge, matching the edges (1).
Step 6:
Place
the front outer piece that
you just decorated with the ribbon/ ric rac right side down onto the zipper and pin in place (2), sandwiching the zipper in between the 2 pieces of fabric. |
Sew
along the edge using a zipper foot,
taking care to not sew too close to the zipper teeth. |
 |
|||
 |
Step 8:
Iron
the front and back pieces of the
purse away from the zipper. |
|||
Step 9:
To
complete the other side of the purse, place the outer fabric right side up
(make sure the sew in interfacing is underneath the outer fabric piece).
Place
the zipper teeth down so that the outer fabrics are right sides together.
Place the right side of the lining fabric on top of the zipper, making sure
all the seams match, pin.
Stitch
along the edge again, using a zipper foot and taking care not to sew too
close to the zipper teeth.
|
 |
|||
 |
Step 10:
Press
the outer and lining fabrics away
from the zipper.
Open
the zipper before starting the
next step, otherwise you will not be able to pull the purse through to the right side. |
|||
Step 11:
Fold
the purse over along the zipper and match the right sides of the purse outer
and lining.
Fold
the zipper towards the lining and pin in place at either end. Pin around the edge and stitch, starting in
the lining. Make sure you leave a gap in the lining by finishing 2” in the bottom of the lining so you can pull the purse through to right side out.
|
 |
|||
 |
Step 12:
Trim
and the corners of the purse
once you have sewn around the purse. This will give you neater corners. |
|
Step 13:
Once
you have trimmed the corners, trim the ends of the zipper.
Then
pull the outer part of the purse out through the gap in the lining.
|
 |
|
 |
||
Push the lining into the outer fabric
and your purse is finished!
I hope you like the instructions!
Please feel free to use the instructions, but remember to give credit to this blog.
I hope you like the instructions!
Please feel free to use the instructions, but remember to give credit to this blog.
Little Elephants
Last week I finished my blue elephants quilt for the son of my lovely friend Liz. It was a first birthday present for him.


I used pebbles on the solid blue strips:

Angela recommends using a pen and paper to sketch out the quilt design. Really helps to think ahead when you are actually quilting.
 The texture was great! It made it feel gorgeous!
I decided to use the figure of eight pattern on the border... this one needs some more work, but I did enjoy giving it a go!

I really loved making this quilt and trying out new techniques.... just need to find another small child I can make another one for!
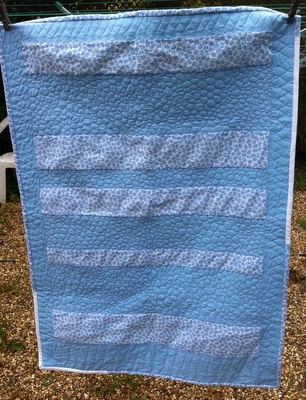
It is a really simple design, taking inspiration from Film is in the Fridge blog. It is strips of blue matched with gorgeous little elephant fabric... I love those little elephants!

It is the second time I have free motioned a quilt from start to finish - the first time as back in February for mini. I used my Craftsy class by Angela Walters to improve my quilting skills. The back looks just as lovely as the front:

I used pebbles on the solid blue strips:

Angela recommends using a pen and paper to sketch out the quilt design. Really helps to think ahead when you are actually quilting.

I decided to use the figure of eight pattern on the border... this one needs some more work, but I did enjoy giving it a go!

I really loved making this quilt and trying out new techniques.... just need to find another small child I can make another one for!
Tuesday, 9 October 2012
Anna Time...
On Mondays I have been teaching basic sewing skills to a group of mums in Cheltenham. They have been identified as low in confidence or needing support in getting into work. My job is to build their social skills and confidence through sewing lessons.
For me it is varied and interesting work. This group have turned from quiet and unsure, to chatty and confident, whilst making things from fabric they had at home and scraps I have taken along. Sadly my work with them is nearly done!
Whilst discussing their learner logs and the progress they have made today one of the learners asked me about bringing in more Bondaweb for her project. I said no problem, if she wrote the request on her project design sheet I would be checking through them all on Sunday afternoon. By doing it then I can make sure I have all the supplies I need for Monday morning.
She said "When is Anna time? When do you have time for you?"
Kinda funny since their little club is called Time Out because it is about giving them time out!
I drove home thinking about what she had said... my life is full... I teach 3/4 days a week, I run 2 scouting groups and I am raising 3 boys on my own...
My teaching is in all sorts of places across Gloucestershire with groups of lovely people who have been targeted as needing support to build confidence and social skills... sewing is kinda secondary to the main objective of helping people to gain enough confidence to go into more formal education or the work place...
Interesting work, but I give some of me to every group I work with. I use my ability to talk to anyone to help them relax and feel more confident. I am like a chameleon, adjusting my planning and teaching style to suit the learners.
Anna time is limited by the nature of being self-employed - I know a lot of you are, you can't just turn it off, you are the responsible for every penny you earn.... It is limited by 2 scout groups full of wonderful boys... It is limited by running a house and raising my 3 gorgeous boys on my own..
I wouldn't change any of it... I simply love my job, I love my role as scout leader and I simply adore my babies... but I have realised that to be all of those things and be the best I can, I do need to start being selfish and think about organising Anna Time...
For me it is varied and interesting work. This group have turned from quiet and unsure, to chatty and confident, whilst making things from fabric they had at home and scraps I have taken along. Sadly my work with them is nearly done!
Whilst discussing their learner logs and the progress they have made today one of the learners asked me about bringing in more Bondaweb for her project. I said no problem, if she wrote the request on her project design sheet I would be checking through them all on Sunday afternoon. By doing it then I can make sure I have all the supplies I need for Monday morning.
She said "When is Anna time? When do you have time for you?"
Kinda funny since their little club is called Time Out because it is about giving them time out!
I drove home thinking about what she had said... my life is full... I teach 3/4 days a week, I run 2 scouting groups and I am raising 3 boys on my own...
My teaching is in all sorts of places across Gloucestershire with groups of lovely people who have been targeted as needing support to build confidence and social skills... sewing is kinda secondary to the main objective of helping people to gain enough confidence to go into more formal education or the work place...
Interesting work, but I give some of me to every group I work with. I use my ability to talk to anyone to help them relax and feel more confident. I am like a chameleon, adjusting my planning and teaching style to suit the learners.
Anna time is limited by the nature of being self-employed - I know a lot of you are, you can't just turn it off, you are the responsible for every penny you earn.... It is limited by 2 scout groups full of wonderful boys... It is limited by running a house and raising my 3 gorgeous boys on my own..
I wouldn't change any of it... I simply love my job, I love my role as scout leader and I simply adore my babies... but I have realised that to be all of those things and be the best I can, I do need to start being selfish and think about organising Anna Time...
Monday, 8 October 2012
Experimenting with hexagons!
I have been steadily working on my HexyMF - work commitments and children who insist on scaring their mother with trips to the A & E have made my progress slow down..
But I did have a birthday present to make for one of my closest friends. Liz is a an amazing friend. She has been there to listen and gives out most amazing hugs... at a moments notice she has taken the boys if there has been an emergency. Without her and another couple of people we would have been in the muck more than once!
So what to make her....
Her living room has lilac and green curtains... I had an idea late one evening of using the lilac colourway of Katherine's Wheel by Nel Whatmore that I had bought last month to make her a cushion cover...
A few weeks ago I bought the wonderful book Hexa-Go-Go by Tacha Bruecher. As an EPP novice I wanted to explore the idea of hexagons more and Tacha's book is perfect. It is chockablock full of designs and ideas that use hexagons and EPP to the max - I really recommend it!
So I cut out the hexagons and put together a design:


I love the finished cushion, and luckily so did Liz!
PS Sorry about the bad photography - late nights sewing and forgetting my digital camera batteries!
But I did have a birthday present to make for one of my closest friends. Liz is a an amazing friend. She has been there to listen and gives out most amazing hugs... at a moments notice she has taken the boys if there has been an emergency. Without her and another couple of people we would have been in the muck more than once!
So what to make her....
Her living room has lilac and green curtains... I had an idea late one evening of using the lilac colourway of Katherine's Wheel by Nel Whatmore that I had bought last month to make her a cushion cover...
A few weeks ago I bought the wonderful book Hexa-Go-Go by Tacha Bruecher. As an EPP novice I wanted to explore the idea of hexagons more and Tacha's book is perfect. It is chockablock full of designs and ideas that use hexagons and EPP to the max - I really recommend it!
So I cut out the hexagons and put together a design:

I backed the hexagons with cream and set about free motion quilting the negative space:

I didn't have any cream Aurifil so I used aluminium instead that give the quilting a silver appearance which worked really well!

I love the finished cushion, and luckily so did Liz!
PS Sorry about the bad photography - late nights sewing and forgetting my digital camera batteries!
Subscribe to:
Posts (Atom)