Showing posts with label Christmas Make. Show all posts

Friday, 9 November 2012

Christmas Coaster


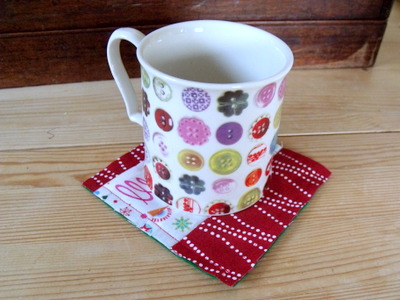
A quick and fabulous Christmas make for children!

These Christmas coasters take minutes to sew and make perfect presents!

Supplies:

  • Felt
  • Christmas Fabric Scraps
  • Thread
Step 1

Cut the felt into 5"squares and the strips into lengths of 5" and varying widths.


Step 2

Choose a first strip and lay it right sides up again one side of the felt square.


Lay the next strip of fabric right side down onto the first one and pin in place.
 
 
Stitch in place with a 1/4" seam allowance.


Open the seam right sides up and carefully iron flat - watch the heat of the iron so you don't singe the felt.
 
 
Step 3
 
Continue placing the strips next to each other a sewing them in place as you go.


Step 4

The square to 4.5" so that any rough edges are trimmed away.


Step 5

Sew around the edges of the square with a 1/4" seam allowance. This will hold the fabric in place on the coaster.


Thursday, 8 November 2012

Fabric Christmas Card


Use the smallest of your Christmas scraps and ribbon making these gorgeous card for family and friends.

Supplies:


  • Card with a hole for your design.
  • Medium interfacing
  • Fabric scraps
  • Ribbon
  • Invisible tape
Step 1

Measure the hole in the card and cut the interfacing and inch larger. This gives you space to decide which part of the finished design you want to show.

Step 2

Take you scraps and lie them onto the glue side of the interfacing, be sure to cover the interface entirely otherwise the glue will ruin your iron!


Step 3

Once you are happy with the positioning, sew the strips into place.


I used straight stitch on the ribbon because the snow flakes are very cool!

But I used the satin foot on the machine along with some snow flake shapes to join the 2 fabric strips:


Experiment with the stitches in contrasting fabrics so they are visible and pretty!

Step 4

Once the fabrics and ribbon have been stitched, cut the excess off the design. To do this, check the placement of the design the in the card window, make sure you don't trim too much!


Step 5
 
Place the design into your card, lining it up in the window and use the invisible tape to tape it in place:


Double check the position on the front:


Step 6

Tape the card flap that covers the window shut and you have a wonderful, unqie Christmas Card!