Friday, 31 May 2013

Trying out new FMQ designs

I am working my way through quilting Maxi's curvy quilt.

A couple of weeks ago I shared my plans for the solid colour sky sections, using swirls and pebbles.


In each of the other parts of the quilt I have been experimenting with other FMQ designs:


This is triangles in a paisley shape, they are within a window surrounded by ovals floating over the fabric:


I love the contrast in design in each shape.


In another block I used messy spirals that meander over the space.


With this quilted interconnected triangular spirals, the texture is lovely!


In this orange window I quilted wavy lines close together:


These are surrounded by arches that reflect the arches of the London city scape on the fabric.


This window has a meandering design with tight swirls. It was great fun to quilt:


Some close, parallel lines..


I love these interlinking square swirls. The look like the building print they are on.


Together the combine to make a gorgeous block!


The quilt is coming together so well. I love the different textures and designs.

I am about 1/2 way through and I would like to get it finished for his birthday on Tuesday so there are going to be quite a few late nights ahead this weekend!

Linking up with FMQ Friday.

Beginners Patchwork - How to Piece


A tutorial for beginners to patchwork: How to Piece Patchwork.

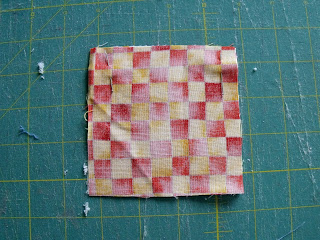
Cotton fabric generally has 2 sides, the right side and the wrong side. The right side is The side where the pattern is brightest:


For solid colour difference is much harder, if not impossible, to see. My motto is 'can't see it, don't care'!

Place one of the squares on top of the other one, right sides together:


Match the edges all around the square and pin, perpendicular to the edge that you are going to join:


Your sewing machine should sew over the pins, if the pin heads are placed on the inside of the block.

Using a 1/4" patchwork foot you will sew along this seam.


A patchwork foot has a metal guide on the right hand side that allows you to line the fabric up against it to give you the perfect 1/4" seam.


Sew this seam, ensuring that the fabric is lined up with the 1/4" guide, remembering to back stitch at the beginning and end:


Back stitching ensures that your stitching won't come apart, so make sure you always back stitch.


Once the 2 blocks are sewn together, the seam needs pressing. You will need a really hot iron.

I prefer to press the seam open, but you can press them towards the darker fabric - experiment and decide which way you prefer.

First spread the seam with your fingers:


Then use the iron to flatten the seam completely:


Turn the piece over and iron the other side too. 


I hope this helps you on your patchwork journey!


Thursday, 30 May 2013

Testers needed!


I am in the final stages of writing a baby quilt pattern for beginners and I am looking for 3 testers who would be willing to try out the pattern called Splitting Squares.

It is a simple quilt that will help you learn cutting and piecing skills, and give you an amazing and beautiful quilt for a small child or baby.

Would you be interested in helping?

I would love to hear from you!

Email me for more info!

Thanks!


Wednesday, 29 May 2013

The New Guard

On Sunday I managed a few precious moment whilst the boys were playing to watch some of the Quilt Con talks on Craftsy.

I watched Mary Fons talking about the legacy of quilting and the gaps between the old school and the modern movement that is sweeping through the quilting community. She was a very dynamic speaker with oodles of energy!

She raised so many interesting points. There is a divide between the 2 communities, that comes partly from the age differences involved. When I started quilting 17 years ago I would attend fairs and shows only to be looked on as an oddity. I was repeatedly told that if I worked hard enough I would have a stash/get my point perfect/be as good as them. They were all comments from well meaning members of the 'old guard' of quilting (Marys words).

But those well meaning comments were made without ASKING me what I had actually achieved to date. Without even stopping and thinking that maybe I have a stash or that despite my age I may be able get perfect points.... It was a ageism in reverse! At 20 I was too young to possibly know what I was doing...

I was at the start of my journey, but I had been patchworking for 2 years by then and had taught myself through books as the classes were full of the 'old guard' who were nice, but overwhelming with patronising comments.

When I started there were rumblings of the hobby dying a death due to the 'old guard' getting older and no-one coming into the hobby who was young. It was a very real fear, but I always despaired that the very people concerned with young not coming into quilting, were the ones who put us off!

I was a rare young quilter, a complete oddity among family and friends - until they wanted a quilt. I knew no other quilters as young as me. I felt isolated and on a limb in a world before blogs and reliable internet (I know, there was such a time!).

Now I am part of an online community that embraces quilters young and old. The 'new guard' is full of possibilities and there are no anxieties about perfect points - we are making quilts for the joy of making quilts! We are making them for love, comfort and joy. There are numerous designs and scope for exploration without the constraints of perfection - but we mustn't throw out the old...

From the long tradition of quilting - which is hundreds of years old - there is a history of technique and knowledge that must be acknowledged and preserved. We will lose so much if we don't keep one foot in the history of community's heritage, I just hope that as the 'new guard' we are able to accept new ideas and new quilters with open arms and oodles of enthusiasm!

After all, as Mary Fon's said, one day the 'new guard' will become the 'old guard'. I hope we continue to have a wonderful community to be the 'old guard' to!

Mary shared her photo of her modern quilters work space... here is mine, complete with sewing machine, computer, iPad and fabric!


Tuesday, 28 May 2013

Opening a Shop

Today is very exciting!

I am often asked by my students where they can get the best equipment for quilting, and I sell them the equipment and wadding I love using.

This prompted me decide to start selling the supplies online so my learners and followers can find the tools I recommend using quickly and easily from my blog!

The shop opens today and is stocked with a core collection of my favourite tools, including wadding!


To celebrate the opening of the shop over on Etsy, I am offer a 15% discount until Friday 31st May!

Simply use the code OPENING15 at the checkout and the discount will be automatically applied!

There will be more items adding to the shop over the next few days including scrap packs so please keep visiting!

Monday, 27 May 2013

Sewing with kids!

This weekend has been so lovely - a great class, sunshine and time with my gorgeous midi and mini!

On Saturday night after teaching midi helped me to unpack the car and, despite being totally exhausted, we set to work sewing together.

I have date nights with my boys at least once a fortnight, which means time alone with mummy doing whatever they would like to do. Maxi is a film buff so we choose a movie and watch it after the younger 2 have gone to bed. Sometimes it is a movie alone with mummy for midi and mini, but this weekend midi chose an evening sewing with mummy.

I will admit that I was totally exhausted after teaching all day and the last thing I wanted to do was sew again, but I had made a commitment to him and after a mug of coffee and some tea we headed out to the studio.

He sat leafing through loads of books for ideas whilst I unloaded the car... there were a few No's from me as to what we could make - just too tired!


In the end we settled on a pillow for the very precious bunny rabbit that has been companion for 5 years!

With my help we appliqued on Bunny's name and quilted the letters in place (mummy did this bit). Then he set to work pinning the pieces together and sewing:


Midi is 7 and loves using the sewing machine. He works slowly and patiently, asking questions and not getting flustered. The Janome CXL301 has a speed control on it, which is perfect for children. We set up for slow and he can work independently. His seams are pretty good!

As you can see he did a really good job and is really proud of his achievements!


Now bunny has his very own cushion!

Today is bank holiday in the UK and in Tetbury it is the world famous Woolsack races - people running up an incredibly steep hill with a huge sack on their back!  Maxi is taking part with his school so we are going to be cheering from the sidelines this afternoon, but this morning mini and midi have booked another sewing session with mummy... wonder what we will make today?

Linking up with Let's Get Acquainted over at Bitter Sweet Designs.


Sunday, 26 May 2013

Working with Oilcloth

Just over a year ago I made a momentous decision to change my direction, I closed my business Funky Diva Designs and set off on the path of teaching and quilting.

I can't believe it is only a year! The journey has been so much fun and I have met so many interesting people.

Yesterday I taught my first session at the New Brewery Arts Centre in Cirencester. It is one of the biggest arts centres in the area and a lovely setting to teach in.

The workshop was all about sewing with and using oilcloth to make a bag. 

Oilcloth tends to scare people because it is so stiff and the once it is sewn it is marked permanently. But it is very useful for making bags. It's wipe clean and waterproof so perfect for making durable bags.

Yesterday was the first time I had taught how to sew with oilcloth and so it took more planning and thought than my other classes. If you visit my blog often you will know that I believe in planning teaching sessions so that I can give my learners the best possible experience. Planning also allows me to relax knowing I have thought every aspect of the class through - behind my relaxed teaching style is a plan!

It was a great workshop with 10 lovely ladies all keen and excited to learn how to sew. I provided all of the materials and machines so they only had to come along and have fun!

We started with the bag outer and I had 3 designs which started with the basic and went to curves - differentiating the options for learners helps them to be control of their learning! The morning was spent cutting out the design using templates and then sewing the pieces together along with interfacing.

By 12pm our brains had started shutting down so we took an early lunch before attacking a zippered internal pocket. They look amazing but are actually pretty easy!

The last hour of the afternoon looked very much like the Great British Sewing Bee with every frantically trying to get the bags put together - the atmosphere changed from relaxed to tension of the highest order! 

It was great fun and as you can see the bags turned out great!


They all came from the same template, but the choice of oilcloth and the personalisation of the handles and base width changed the bags completely!


These three gorgeous ladies added webbing to make longer straps and they looked perfect! It's something I need to take next time I teach the class...

All in all it was a wonderful day spent with some amazing people. Fingers crossed for more sunshine so they can use their bags all summer with joy!


Friday, 24 May 2013

MIQ - Missing in Quilting!

I have been a bit MIQ this week.

A combination of teaching, Scouting and interview has left me very little time to stop!

Even today I trying to prepare for a class I am teaching for the first time tomorrow - How to make an Oilcloth Tote bag.

In the mist of literally running around the county to various classes I have been worry about something...

I don't achieve enough...

I have never seen myself as a perfectionist - my house is a tip most days, I don't wear make-up and I am  pretty relaxed about most things, so I have never seen myself as a perfectionist.

Recently I have been watching my middle son struggle with being a perfectionist and wondering where that comes from... I think I now know!

It is interesting when you realise something about yourself and it helps you to connect the dots of your life!

I am a perfectionist in the sense that I never think that what I have done is enough. There is always space to be much better, do to more...

After talking to my lovely coach Gail Gibson we have worked out a plan to help me sort through the mess of ideas, plans and thoughts. Now to get it rolling....

On a quilting note, I have been working on the first quilt for my boys school library.


I have started using a pattern that I learnt with my Craftsy ClassFree Motion Quilting VOL 2 with Leah Day. It is called Cat Hair Ball filler. It looks like a child has been scribbling over the quilt. I am also quilting words into the quilt design that are book and school related.


It is the first of 2 quilts for the school!


Monday, 20 May 2013

Winning an Award

It has taken a few days to process the weekend!

On Saturday I attended the Adult Education Learners Award ceremony for Gloucestershire. I had been nominated for Outstanding Tutor of the year, which had really shocked me!

Much to my amazement I actually won!


Receiving my award was so nerve wracking! This is the Head of Education and Libraries in Gloucestershire!

The person who had nominated me had written a statement about me that was read out. I had to fight back the tears! She praised my relaxed teaching manner that helped learners to settle into my groups. Not only that,  but she highlighted that my biggest skill is the fact my relaxed manner is backed up with rigorous planning and in depth knowledge of each of my learners achievements, skills and needs. Learners feel confident in my classes because they know I know them.

It was a lovely morning out which involved getting my nails done and having a cuppa with some of the learners who also got an group award.


I had invited my lovely friend Helen and my eldest son came too!


We had a lovely time!

When the ceremony had finished the husband of one of the learners came over to talk to me. With tears in his eyes he explained that I would never know how much my lessons had changed his wife's life. That she had regained some of the confidence she had lost 5 years before following a major life changing event. She now has friends and leaves the house. He thanked me for giving her so much, and for helping him too...

I had to fight back the tears.... I was so moved and pleased that I had been able to help them both.

That is why I love my job as a tutor. I love working with people who previously had found a classroom environment stressful. I love helping people to learn a new skill whilst building their self-confidence.

I love working with people who have struggled with things in their life, but have taken the risk of coming to my classes. Watching them change and grow is incredibly rewarding!

That is why I spend hours completing paperwork for classes and making sure everything is organised.

It is quite simply the best job in the world!


Linking up with Let's Get Acquainted at The Sewing Chick.

Friday, 17 May 2013

Tova #3

Earlier this week I finished my third Tova... it would be accurate to say I am obsessed!

I love the shape and the fit - I am pretty proud of myself for enlarging the pattern it is working!

It isn't up to The Great British Sewing Bee scrutiny, but I love them!

So the one I made this week looks like this:


It bright and summery! I made a few adjustments to the pattern for this one.

Firstly I put pleats into the front instead of gathering. Even trying really hard I just couldn't the gathering even so I just decided to make my life simpler and use pleats - after all that is the bonus of making your own clothes, you can choose!


Next I wanted short sleeves so I can wear it in the summer and add an under layer in the winter if want to. On the pink shirt I had shortened the sleeves and left them with a basic hem. This time I decided to add some elastic to see how that would look.


They have given me puffy sleeves. That along with a tiny bit of gathering at the top has changed the book of the sleeve!

Finally I wanted a more fitted look that Tova #1. So I marked and pinned the sides pulling it in by over an inch on the waist and the taking it out again. Much more fitted, but still mega comfy!


Is it the last Tova?

I really doubt it! Love the pattern and I am enjoying using it as a launching point for trying different ideas out!

I haven't decided what to wear to the awards ceremony yet, but I bought tights for this dress just in case!

Linking up with TGIFF over at Ms Midge